
DCAUT Beginner's Guide Running Your First DCA Trading Bot From Scratch
DCAUT Beginner's Guide Running Your First DCA Trading Bot From Scratch
Published on: 9/20/2026
If you've spent any time in crypto, you've probably heard of trading bots, and maybe even clicked into the built-in trading bot features on Binance or OKX. But when it comes to picking a strategy, setting parameters, or making sense of all those backtest numbers, most people get lost right there and either give up or just copy someone else's config. This guide aims to explain how to actually use a trading bot, so you can put it to work and let it support your trading decisions instead of setting it up and forgetting about it. Every step and every screenshot below is a real walkthrough on the DCAUT platform.
So first, what is DCAUT? It's a crypto trading bot marketplace focused on the DCA strategy. Compared with the built-in trading bots on exchanges like Binance and OKX, the main differences are that its entry spacing and take-profit adjust dynamically with market volatility, it can wait for a trend to play out before selling, the marketplace only lists trading bots that other users have already run live with tuned parameters, and one dashboard manages your Binance, OKX, Bybit, and Bitget accounts, four crypto exchanges, without switching back and forth. Each trading bot runs on your own exchange account: it's not copy trading, it never holds your funds, and if something goes wrong, only that one trading bot is affected. Once that's clear, the two parts below are easy to follow. Part 1 takes you from sign-up to running your first DCA trading bot; Part 2 is a parameter-by-parameter breakdown of the strategy workbench, so you can come back and look things up whenever a control isn't clear.
Part 1: From Sign-Up to Your First Running Trading Bot
If this is your first time opening DCAUT, just follow along: sign up, connect your exchange API, pick a strategy, backtest, launch. Every step has a real screenshot to check against, so you can click along. Already done part of it? Jump straight to wherever you got stuck.
Step 0: Take Two Minutes to Learn the Layout
The first time you open the DCAUT dashboard, the long menu on the left can be a bit overwhelming and you may not know where to click first. Broken down, it's actually simple. The left navigation is where you'll spend most of your time: "Bot Marketplace" (public trading bots other users have listed, the ones you've subscribed to, and the ones you've published), "Workbench" (Run Management and My Strategies), "API & Account" (connect your exchange API), and "Feedback". Strategy parameters and backtesting live in a separate full-screen workbench, which you open from "My Strategies". The bottom-left corner has social links, terms, account settings, language and theme switches, and notifications. You won't use those often; just know where they are.
Boil it all down and a new user only needs five steps: sign up → connect an exchange API (e.g. the Binance exchange) → pick a strategy and backtest it → launch the trading bot → keep an eye on it in "Run Management". The Bot Marketplace, membership plans, and account security all support these five steps; look at them when you need them.
Step 1: Sign Up and Log In
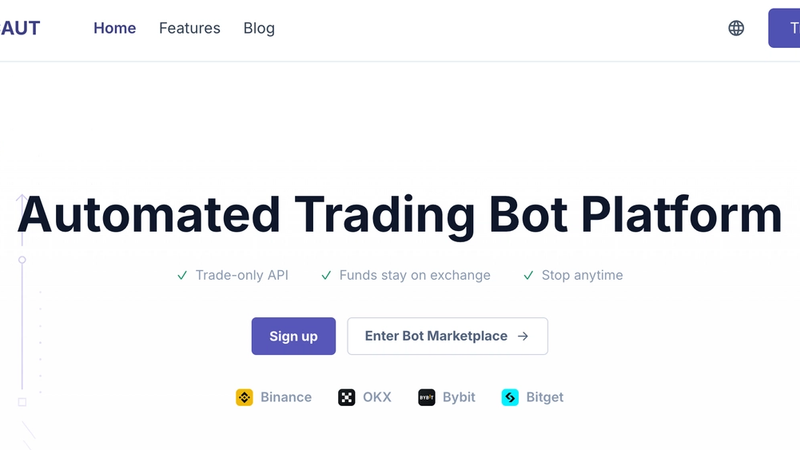
The login page supports email + password, or you can sign in with one click using a Google or Telegram account, no separate registration needed. If you forget your password, you can reset it by email. The two small icons in the top-right corner switch the language and toggle dark/light mode.
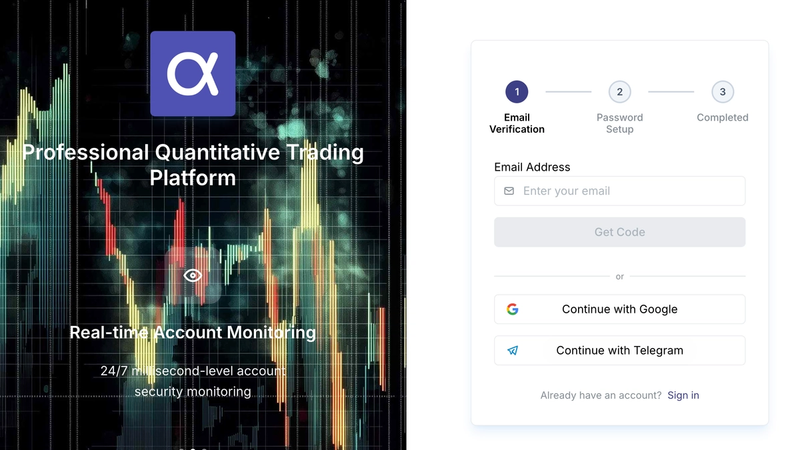
Signing up takes three steps: verify your email, set a password, done. Enter your email, click "Get Code", enter the code, then set your password. There's no separate username to choose, so it's quick.
After you sign up, a three-step onboarding guide pops up automatically: choose a subscription, connect an exchange API (e.g. the Binance exchange), and launch a trading bot. You can skip it, because Steps 2 through 6 below cover exactly the same things in more detail.
Step 2: Browse the Bot Marketplace (Optional, Skip If You Want to Dive In)
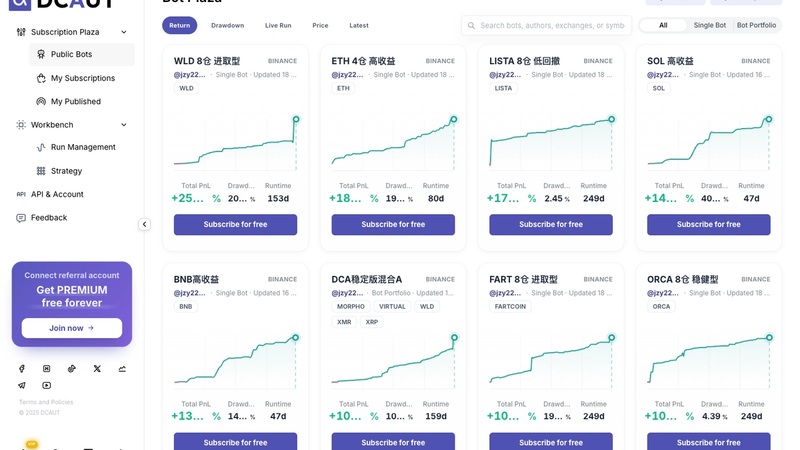
The Bot Marketplace is essentially a trading bot market: users can list trading bots that have delivered results in live trading, and when you find one you like, you click "Subscribe". DCAUT copies that bot's trading strategy parameters and runs them independently on your own exchange account (such as your Binance exchange account). It's not a copy-trading mirror, it can't touch the other funds in your account, and if something goes wrong, only that one trading bot is affected.
- Across the top are several leaderboards: Top Returns, Lowest Drawdown, Live, Price, and Newest, each sorted by a different metric. If you want to see which trading bot strategy makes the most or which trading bot strategy loses the least, just switch tabs. On the right you can search by trading bot name, author, exchange (e.g. the Binance exchange), or coin, and filter to show only single trading bots or trading bot portfolios.
- Each trading bot card shows the name, the exchange (e.g. the Binance exchange), author, type, last update, the coins it trades, a return curve, and the three most telling numbers: total P&L, drawdown, and how many days the trading bot strategy has been running. Those three numbers are usually enough to decide whether it's worth a closer look.
- The "Free Subscribe" button on the cards shows that most trading bots in the marketplace are currently free. The few paid ones display their price up front; nothing is hidden.
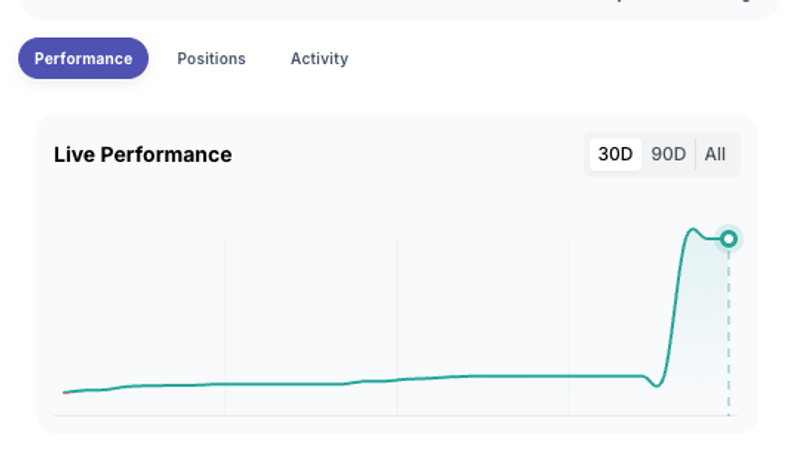
Open a trading bot and the detail drawer first lists its type, trading pair, author, price, and last update, followed by three tabs: "Performance" shows the live trading curve, switchable between 30 days / 90 days / all, along with return, max drawdown, how many days the trading bot has been running, realized and unrealized P&L, and number of entries; "Positions" shows what it's currently holding; "Updates" shows posts from the author. The "Previous / Next" buttons at the top let you flip through the leaderboard one bot at a time without leaving the detail view.
If you're not ready to configure parameters yourself, subscribing to a free DCA trading bot in the marketplace is the fastest way to start. After subscribing, it appears under "My Subscriptions" and runs independently on your own account, provided you've connected your exchange API (e.g. the Binance exchange) in Step 3. Otherwise the bot you subscribed to won't be able to run.
Step 3: Connect Your Exchange API
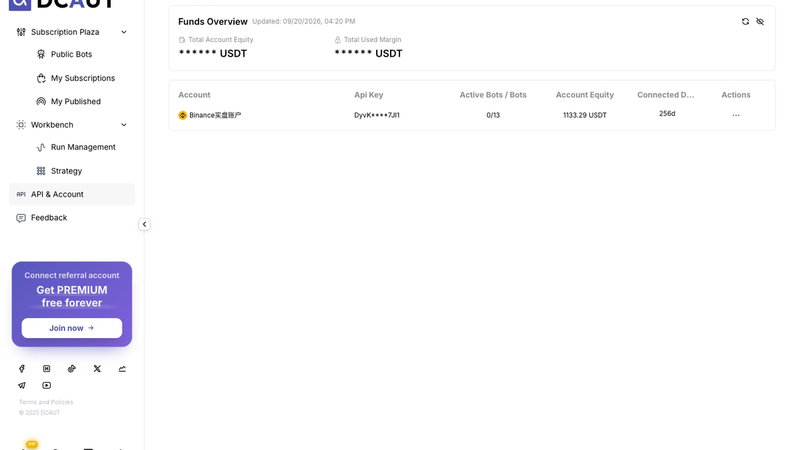
The "API & Account" page manages every exchange account (e.g. the Binance exchange) you've connected. "Funds Overview" at the top sums up total equity and total margin in use across all accounts; click the eye icon in the top-right if you'd rather not have the numbers visible. The table below has one row per account: account name, API Key (automatically masked, so the full key is never shown), number of running trading bots and the limit, account equity, and how long it's been connected. The action buttons on the far right cover updating keys, renaming, reconnecting, disconnecting, and deleting.
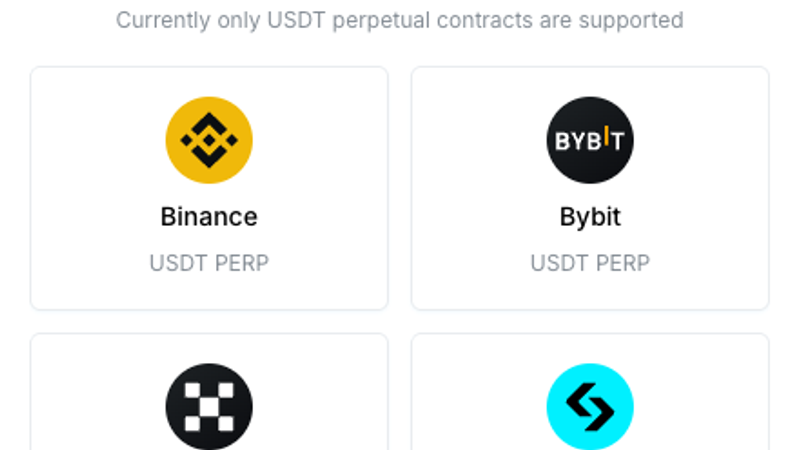
Connecting an API is probably the step new users hesitate over most. Handing your exchange account to a third-party platform feels a little uncomfortable, and that's perfectly normal. Click "Add New API" and choose your exchange: Binance, OKX, Bybit, or Bitget. Currently only USDT perpetual futures are supported, not spot. The page states clearly that API keys are stored encrypted and that DCAUT only requests trading permission, never withdrawal permission. That's the baseline for account safety. From there you can either use one-click authorization or paste your keys in manually. In other words, whether you're connecting a Binance futures trading bot or a futures account on OKX, Bybit, or Bitget, the process is the same.
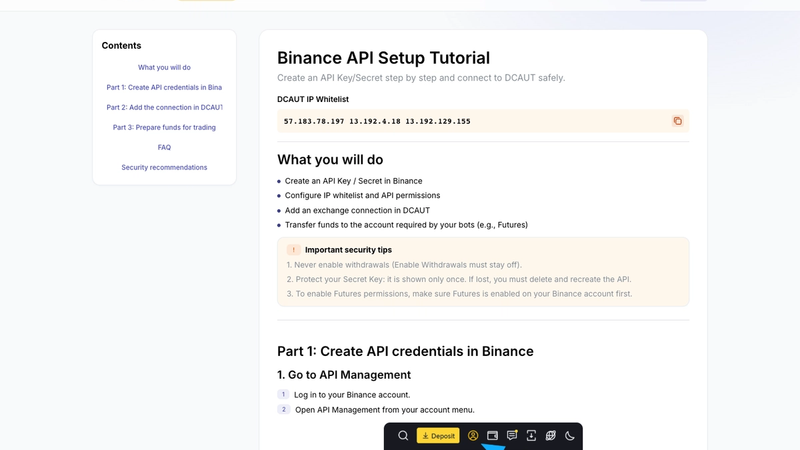
If you go the manual route, DCAUT has a companion guide (/user-guides/binance-api) that walks you through generating an API Key in your Binance account, enabling futures permission, adding DCAUT's three outbound IPs to the whitelist, and transferring funds into your futures account. The security advice is blunt: never tick withdrawal permission, and the Secret key is shown only once, so save it right away.
Once connected, go back to the "API & Account" list and you'll see the account's equity and trading bot quota, and the account overview at the top of "Run Management" will show it too. At this point, everything you need for live trading is in place.
Step 4: Choose a DCA Trading Bot Strategy
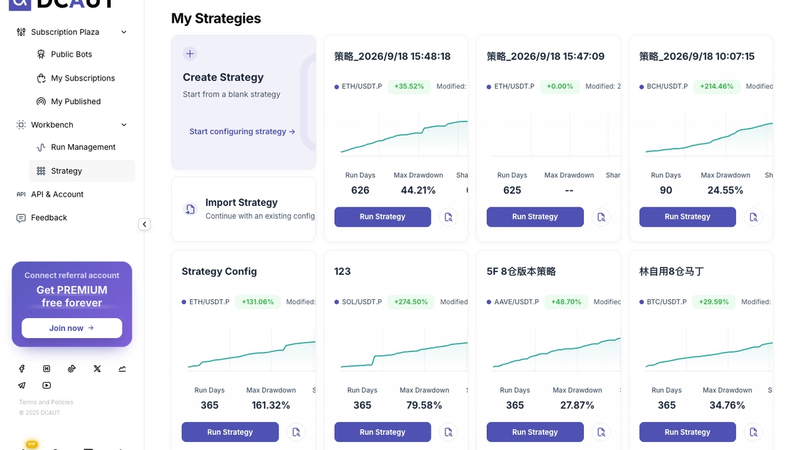
The "My Strategies" page shows every strategy you've saved as a card: trading pair, return from the last backtest, last modified, a backtest curve, and three numbers below: run days (how long the backtest period was), max drawdown, and Sharpe ratio. Click "Run Strategy" to jump straight to launching the trading bot; click the small icon on the right of the card to open the strategy workbench and see detailed backtest results. "Create Strategy" in the top-left starts from a blank slate, and "Import Strategy" lets you paste in a config someone else exported for you.
One reminder: the DCA trading bot return shown on the card comes from a historical backtest. It's not money this strategy has actually made in live trading; those are two different things.
Faced with a whole panel of parameters in the workbench, most beginners have no idea where to start, which is exactly why the official presets exist. We don't recommend beginners configure from scratch. In the strategy workbench, the "Best Practices" column on the left has 14 official preset strategies. Click "Preview" to see the full parameters, or "Load" to apply one directly. After loading, resist the urge to change anything; run a backtest as-is first to see how it behaves, and only then decide which parameter to touch. Part 2 explains what every parameter in the workbench means, one by one.
Step 5: Run a Backtest and Understand the Results
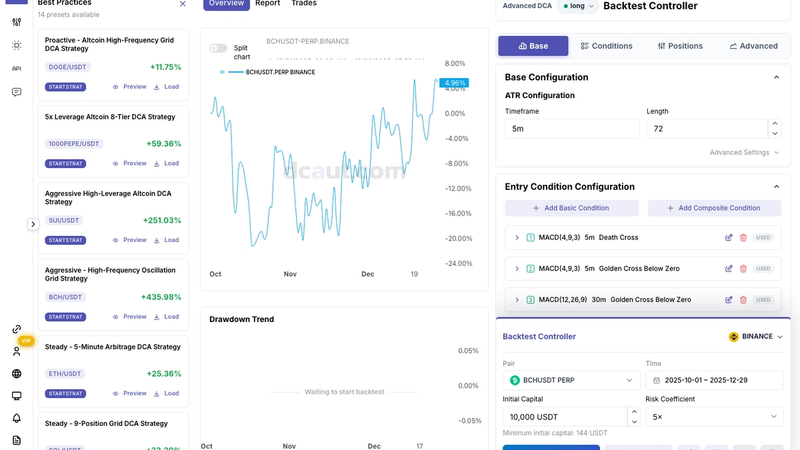
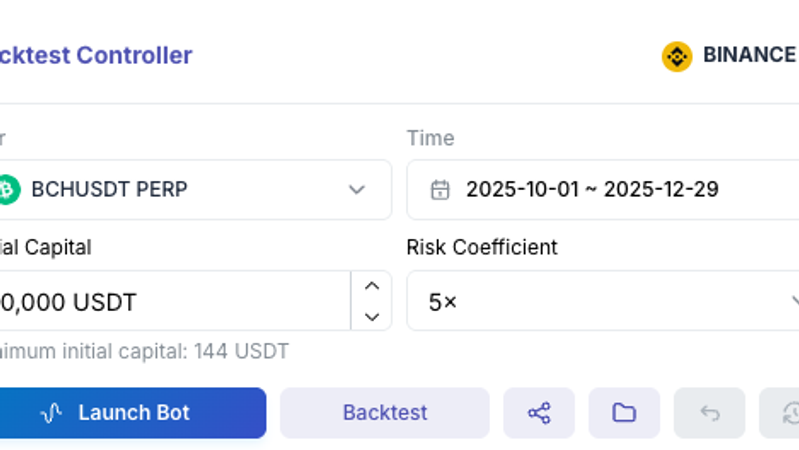
Backtesting is easy to treat as a formality: fill in the parameters, click once, glance at the return, and move on. But the really useful information is on the results page, not in that one number. The "Backtest Controller" in the bottom-right asks for a few things: trading pair, backtest period, initial capital, and risk coefficient (in plain terms, the leverage multiplier). Fill them in, click "Backtest", wait for the progress bar to finish, and the results appear in the middle area.
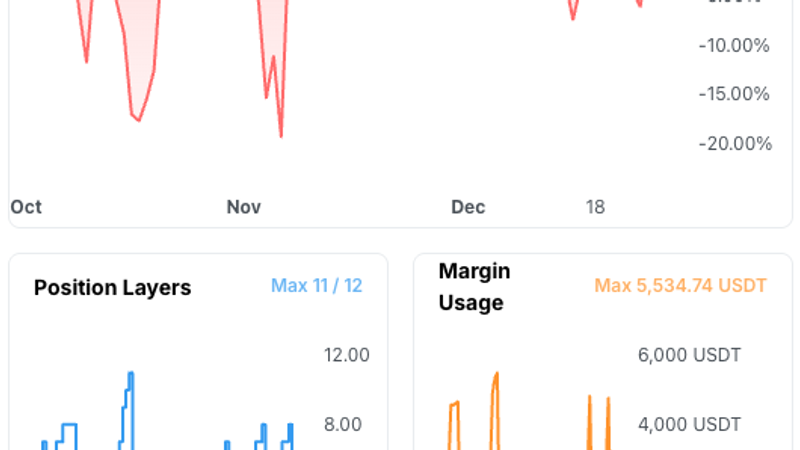
When reading backtest results, don't look at the return first. This order is more useful: start with "Drawdown" and "Max Drawdown", which show how much this trading bot lost at its worst moment; then the "Position Depth" chart, where Max tells you the deepest position level it reached; then the peak of "Margin Usage", which shows how much of your capital was tied up; and only then the return. Why this order? Because with accumulation-style strategies like DCA trading, the win rate is naturally close to 100%: a round only ends when it's in profit, so a high win rate says nothing about how good the strategy is. What really tells you how hairy the period was is position depth and margin usage, and those are the same numbers that external DCA trading bot reviews base their judgments on. A more detailed explanation of each tab and metric is in Part 2, section 6.7.
Happy with the results? Click "Save Strategy" under the "File" icon and give it a name. Backtests are limited per day (10 per day on the free plan), so don't burn through them on random tweaks.
Step 6: Launch Your First DCA Trading Bot
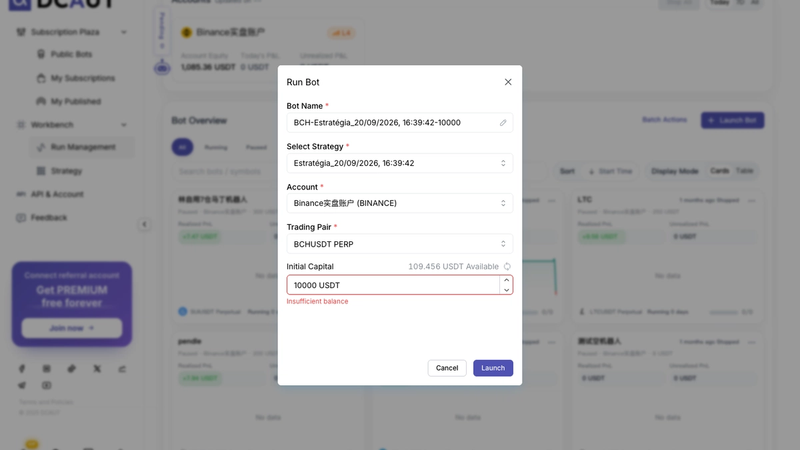
Going from configuration to actually clicking "Launch Bot" is the biggest psychological hurdle on this path; after all, it's real money. Click "Launch Bot" in the top-right of "Run Management", or "Run Strategy" on a card in "My Strategies"; either opens the launch dialog. You'll fill in: the trading bot name, a DCA trading strategy (the one you saved in Step 5), an account (the one you connected in Step 3), the trading pair, and initial capital. The top-right shows how much balance the account has available; enter more than that and you'll see "Insufficient balance". Note that running a live trading bot requires a paid membership. Free users get stopped at this step, and it's the most common reason people upgrade.
Initial capital is the maximum this trading bot can use; multiplied by the risk coefficient, it gives the notional position size when fully deployed. For your first trading bot, we recommend running a small amount for a few days to confirm the entry and take-profit rhythm matches what you saw in the backtest. Add more once you're comfortable; there's no need to go in heavy from day one.
Step 7: Monitor, Pause, or Stop It in Run Management
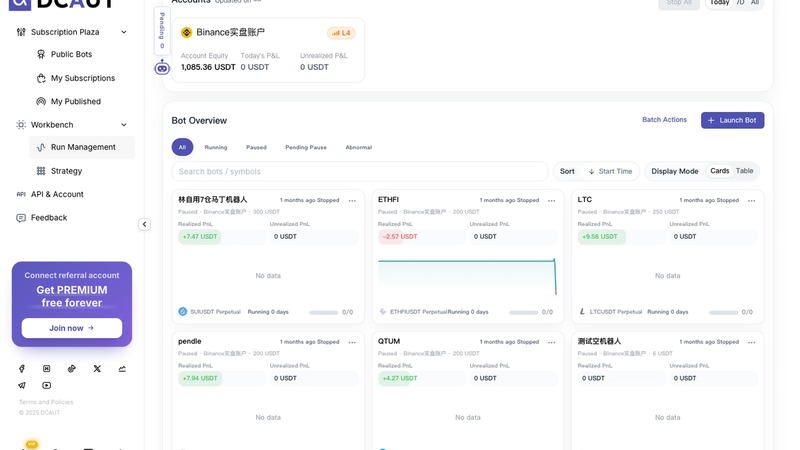
A trading bot isn't something you launch and forget, especially in the first few days. "Run Management" is the control center for all your live trading bots, and once things are running, this is where you'll spend most of your time.
- In the account overview section, each connected exchange account (e.g. the Binance exchange) gets a card showing account equity, today's P&L, and unrealized P&L, with an L2 risk-level tag in the top-right. The "Today / 7D / All" switch on the right changes the time window for the P&L stats. Next to it, "Stop All" is the emergency switch: one click stops every trading bot under this account, so hit it when something looks wrong. "Pending" on the left tells you how many exceptions need your manual attention; don't ignore it.
- The trading bot overview is grouped by status: "All / Running / Paused / Pausing / Error". You can search, sort by launch time, and switch between card view and table view. In the table, each row is one trading bot: name (with trading pair and account), status, realized P&L, unrealized P&L, position value, position count, and layers (current level / total levels configured). For a quick scan of every trading bot's status, table view is more efficient.
The "Launch Bot" dialog is the same one from Step 6: give it a name, choose a saved strategy, a Binance exchange account, and a trading pair, then enter the initial capital. The top-right shows the account's current available balance; enter more and you'll immediately see "Insufficient balance", and the launch button stays greyed out.
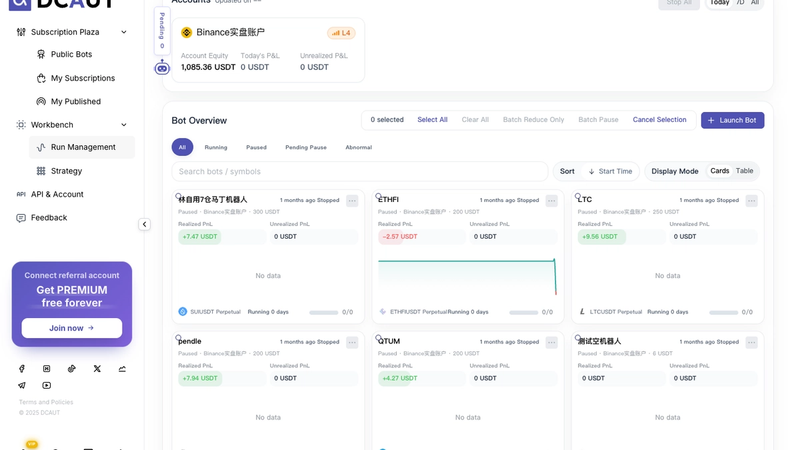
"Batch Actions" lets you handle several trading bots at once: select all, deselect all, batch Reduce Only, batch pause. "Reduce Only" means the trading bot won't open new positions and can only gradually close the ones it already has. If you want to exit without dumping everything at market and taking the loss, this is the better option.
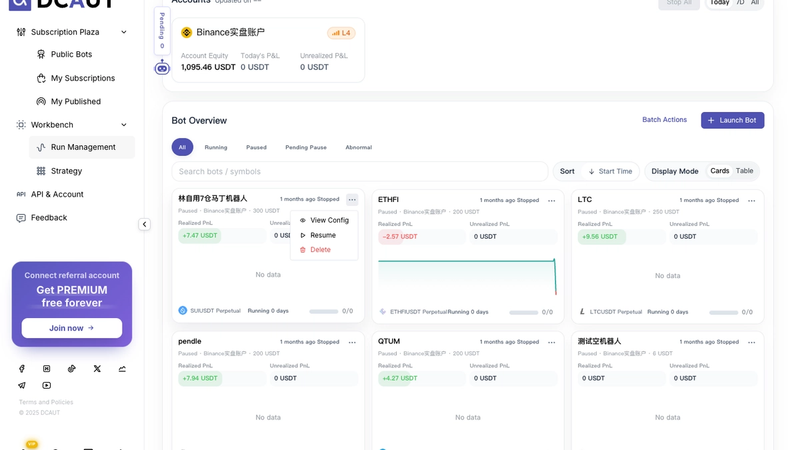
The "…" menu in the top-right of each trading bot card contains View Config, Resume (only shown when the trading bot is paused), and Delete. If the trading bot is running, you'll see Pause and Stop here instead.
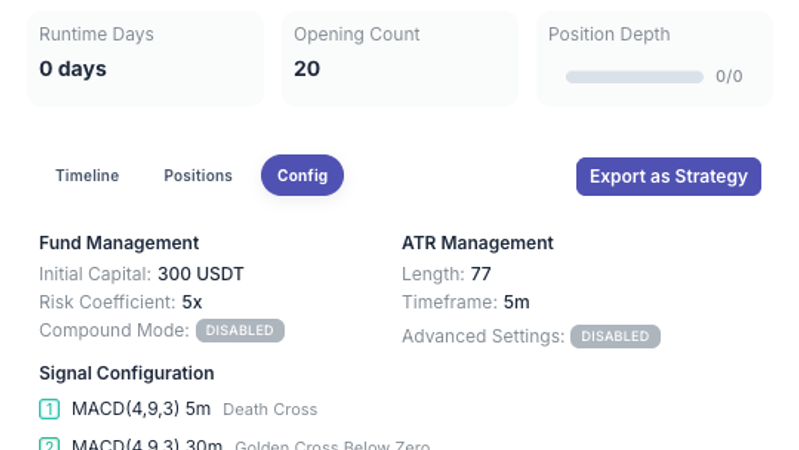
Clicking "View Config" opens the trading bot's detail drawer. At the top you can quickly switch between all the trading bots under your account (13 of them, for example). Below are status, trading pair, and six key numbers: realized P&L, unrealized P&L, position value, run days, opening count, and position depth. Then three tabs: Timeline (everything that's happened to this trading bot since launch), Positions, and Config (the fund management, ATR, signal, and position parameters it's actually using). "Export as Strategy" saves this trading bot's current parameters as a new strategy so you can tweak and backtest again. "Run Control" at the bottom is the pause / resume switch.
Step 8: When to Upgrade Your Membership
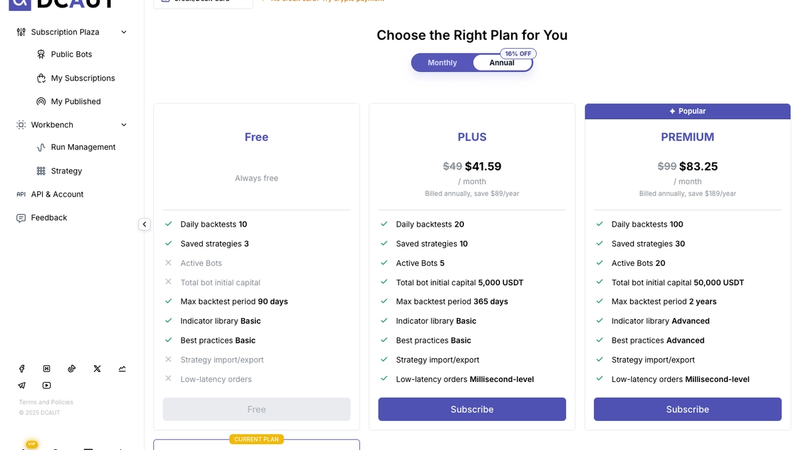
There are four tiers: Free, PLUS, PREMIUM, and ULTIMATE. The differences come down to: daily backtests, saved strategies, how many trading bots can run at once, the cap on total trading bot initial capital, max backtest period, which indicators and official presets you can use, whether strategies can be imported/exported, and order latency. Note that the free plan lets you configure strategies and backtest, but not run live trading bots; that's its biggest limitation.
There are two payment channels, switchable in the top-left. Credit / debit cards go through Stripe, billed monthly or annually; annual works out 16% cheaper than paying monthly.
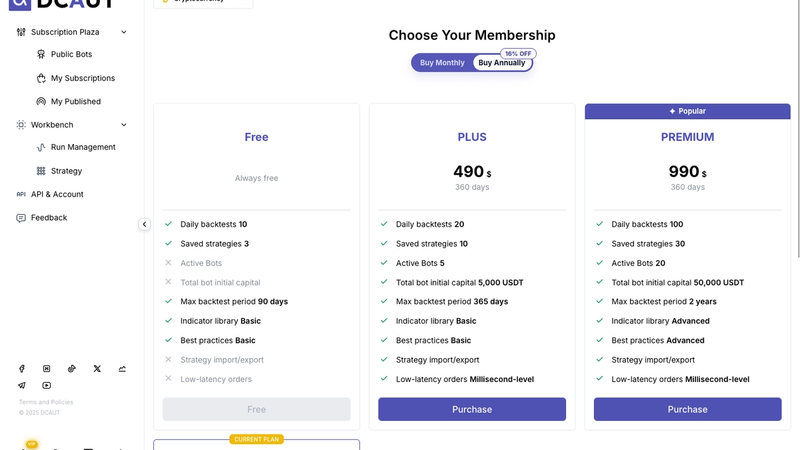
If you pay with crypto, you buy 360 days of access in one go, with no auto-renewal, priced in USD.
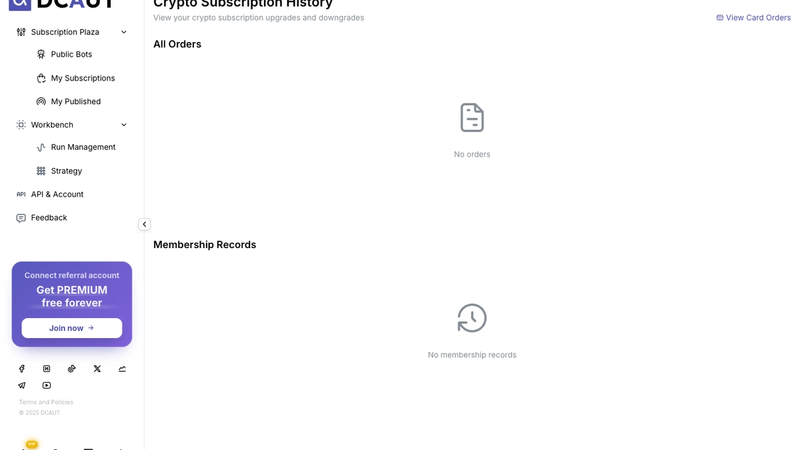
The billing page shows crypto subscription records and membership records separately (purchases, upgrades, downgrades, and expirations are all logged); switch to bank card orders in the top-right.
When should you upgrade? The three most common reasons: you want to go live (the free plan can't launch trading bots), your daily backtest count or backtest period isn't enough, or you want advanced indicators and Trailing Take Profit.
Step 9: Account Security and Where to Get Help
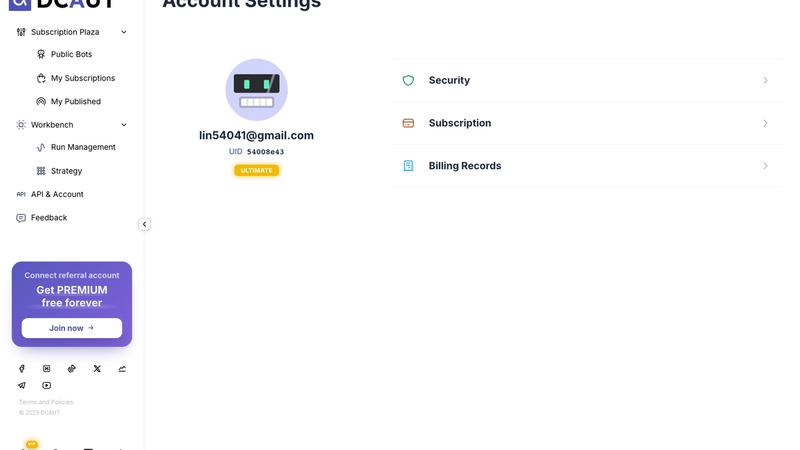
Account Settings shows your email, UID, and current membership tier, with three links below to account security, subscription management, and billing history.
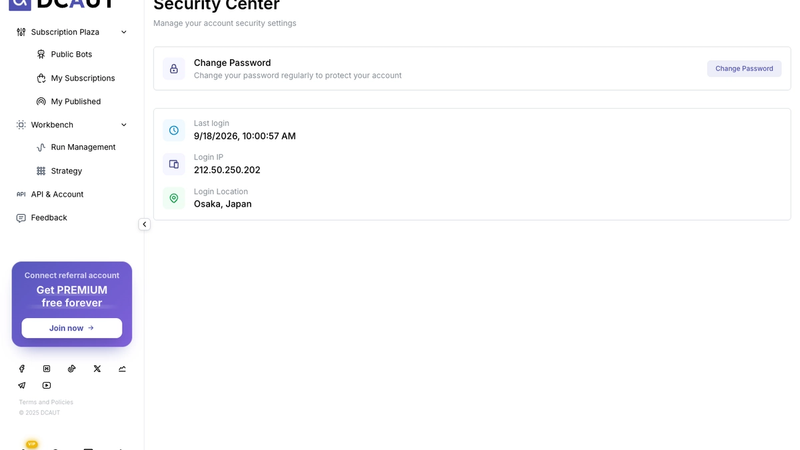
Account security is something most people don't think about until something goes wrong, and then wish they'd checked earlier. The Security Center lets you change your password and shows the time, IP, and approximate location of your last login. Check it now and then to confirm no one has logged in from somewhere unexpected.
Support is currently handled by email: [email protected]. Include your account email, a description of the problem, roughly when it happened, and screenshots; that makes things much faster for support. The "Send Email" button on the page opens your desktop email client with the recipient address already filled in.
Appendix: If You've Subscribed to or Published a Trading Bot
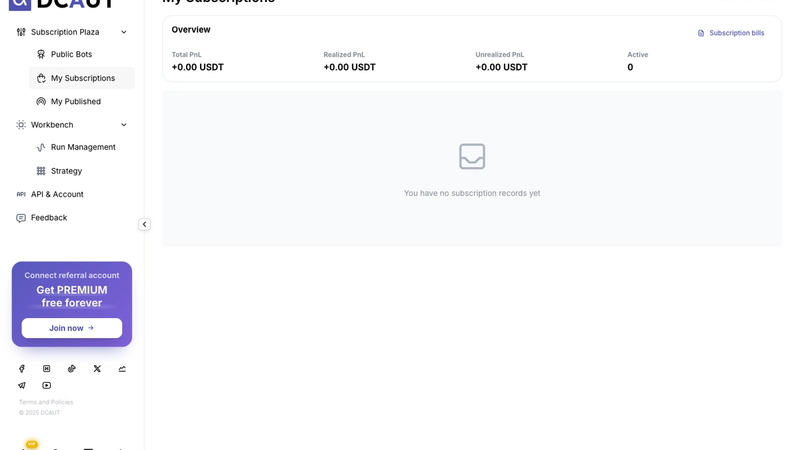
"My Subscriptions" summarizes every trading bot you've subscribed to in the marketplace: total P&L, realized, unrealized, and number of active subscriptions. "Subscription Billing" in the top-right shows every charge.
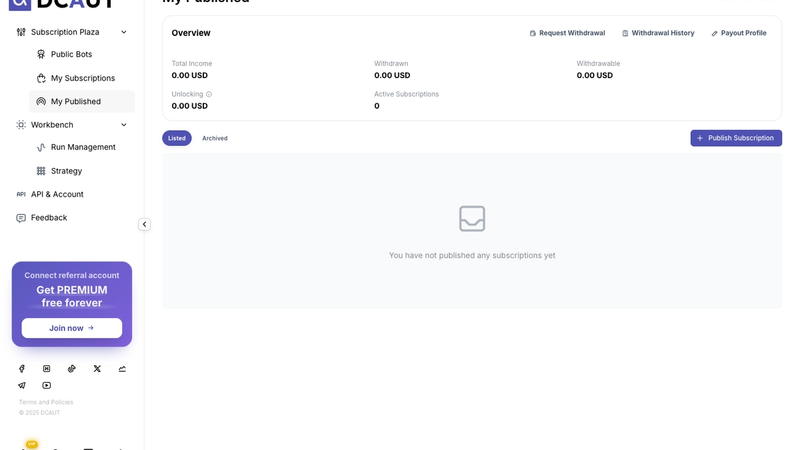
"My Listings" is for people who want to list their own trading bots and earn from them: total income, withdrawn, withdrawable, unlocking amount, and active subscriptions at a glance; the three entries "Request Withdrawal / Withdrawal History / Payout Details" are all here; below that are your listed and archived items. "Publish New Subscription" lets you list a trading bot that has proven itself in live trading. One requirement: the trading bot must have run live for at least 30 days. You can't list it right after configuring.
Part 2: The Strategy Workbench, Parameter by Parameter
Base, Conditions, Positions, Advanced: these panel names can be intimidating at first, but each one is really answering a concrete question: when to add a position, how much, and when to take profit. This part covers only the strategy workbench, the full-screen page you open from "My Strategies", walking through each panel top to bottom and explaining what every control is and how to use it. The strategy's trading logic itself (how the first position opens, how it adds by volatility, what the three-layer take-profit is, why it stops adding in bad conditions) is fully worked out in the article "How the Enhanced DCA Strategy Runs", so we won't repeat it here. We'll just map each parameter on screen to the step it controls.
6.0 What the Workbench Looks Like
The page has three columns: the "Best Practices" preset library on the left, backtest results in the middle (Overview / Report / Trades tabs), and the strategy parameter panel plus Backtest Controller on the right. The four buttons at the top of the right panel, "Base / Conditions / Positions / Advanced", aren't four separate pages; they're four sections of one long panel, and clicking one scrolls you to that section so you don't have to scroll all the way down.
6.1 Trade Direction and the Backtest Controller
At the very top of the panel, next to "Advanced DCA", there's a dropdown for trade direction: long only, short only, or both. If you choose "Long & Short", the trading bot first assesses the trend while flat, then decides whether this round goes long or short. Once set, the direction is locked until every position in the round is closed; it won't flip midway.
- • Exchange: currently only BINANCE is supported. Trading pairs are searchable, all perpetual futures. You choose the backtest period yourself; how long it can be depends on your membership tier, with higher tiers allowing longer periods.
- • Initial capital is the base capital used in both backtests and live trading. Risk coefficient is, plainly, the leverage multiplier; it's called "Risk Coefficient" rather than "Leverage" as a reminder that it amplifies risk as well as returns. Below it you'll see a "Minimum Initial Capital", a threshold derived from the trading pair's minimum order size; the system won't let you run below it.
- • The "Launch Bot" button takes the current parameters straight to live trading, while "Backtest" runs them over historical data first. Beginners should backtest after every parameter change instead of launching directly.
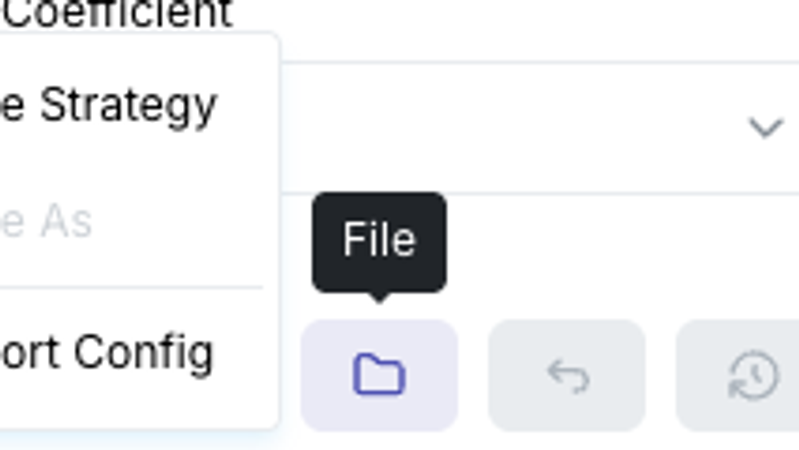
- • The four small icons on the right are: Share (save the current config and generate a shareable link), File (save strategy / save as / import config), Revert (roll parameters back to the last version that completed a backtest successfully, so you don't have to undo changes by hand), and History (view previous backtest results).
6.2 Base Configuration: How Volatility Is Measured
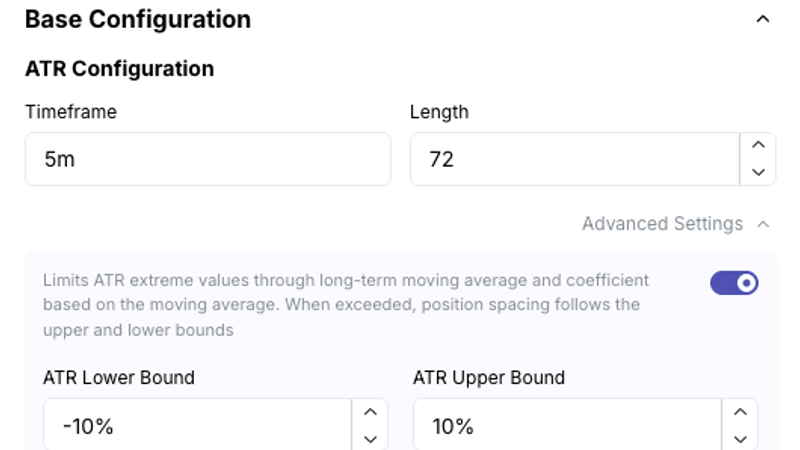
An acronym like ATR is easy to skip over the first time you see it, but it simply means "how much the market has been moving lately". "Base Configuration" has just one group of parameters, used to calculate that volatility: "Timeframe" sets which candle period to use, and "Length" sets how many candles to look back. The default is 5 minutes, 72 candles. This value matters a lot, because every "Spacing" and "TP" value in the position table below is measured in units of it.
Open "Advanced Settings" to see the ATR upper and lower bounds, defaulting to -10% to 10%. They use a long-term moving average to put a range around volatility, so when the market goes extreme and volatility suddenly expands or collapses, entry spacing doesn't run away with it. As the interface puts it: a long-term moving average and a coefficient based on it cap the ATR's extremes; when the limit is exceeded, entry spacing uses the bound instead.
6.3 Entry Conditions: Condition Library, Parameters, Composite Conditions
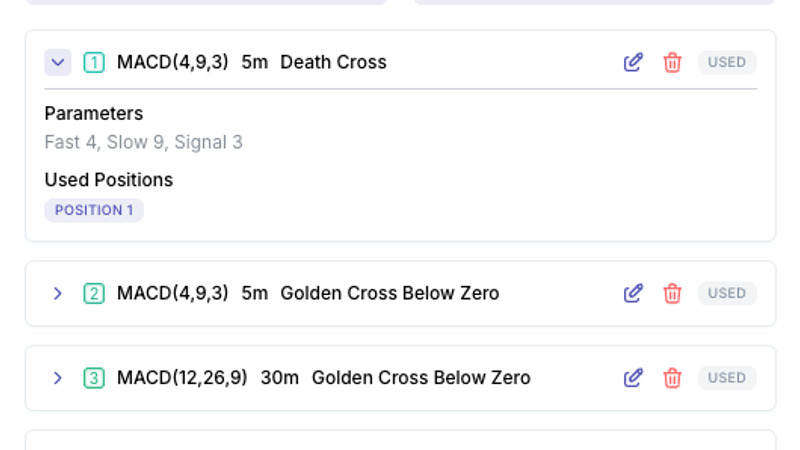
Conditions are the entry criteria assigned to each position in the position table. The default preset ships with 5 MACD conditions, each with a different job: the first is a 5-minute death cross for the first position; the rest are "Golden Cross Below Zero" on timeframes from 5 minutes to 2 hours, used for adding positions. Each condition can be edited or deleted on the right. "Used" means a position is referencing it; to delete it, first unlink the positions that use it, or you'll get an error.
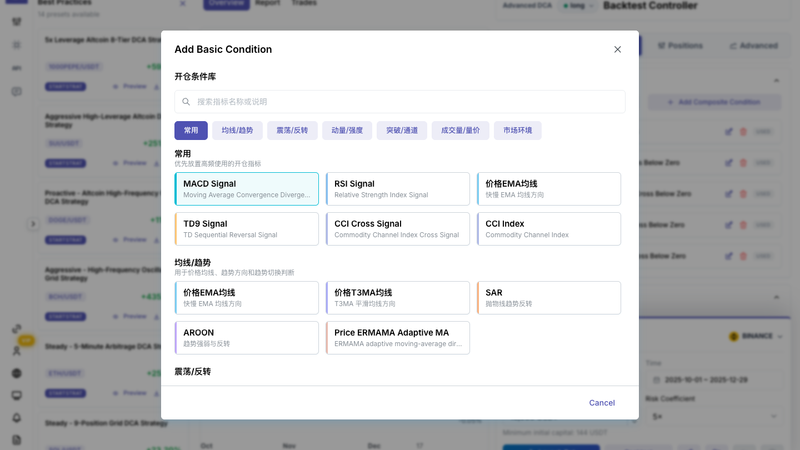
Click "Add Basic Condition" to open the full condition library, organized by purpose: Common, MA/Trend, Oscillator/Reversal, Momentum/Strength, Breakout/Channel, Volume/Price-Volume, and Market Environment. You can also search by keyword.
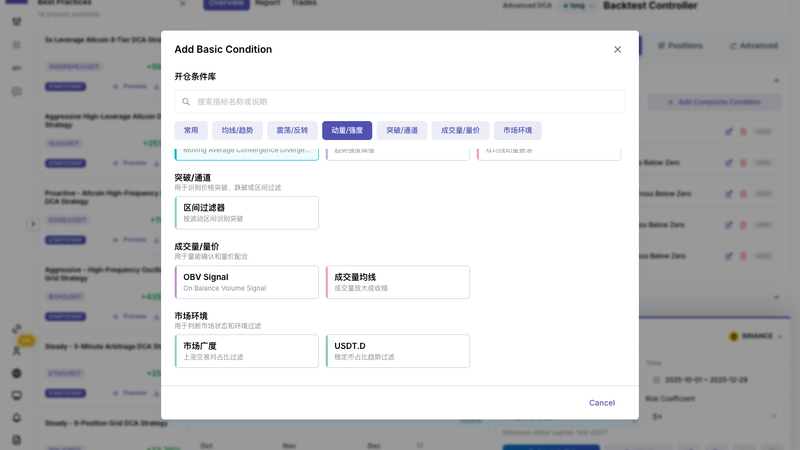
The "Market Environment" category is special: instead of looking at this coin's own candles, it looks at the market as a whole: market breadth (how many pairs across the market are rising) and USDT.D (the trend in stablecoin dominance). Attach these conditions to deeper positions and the practical effect is that the trading bot won't keep buying the dip when the whole market is selling off.
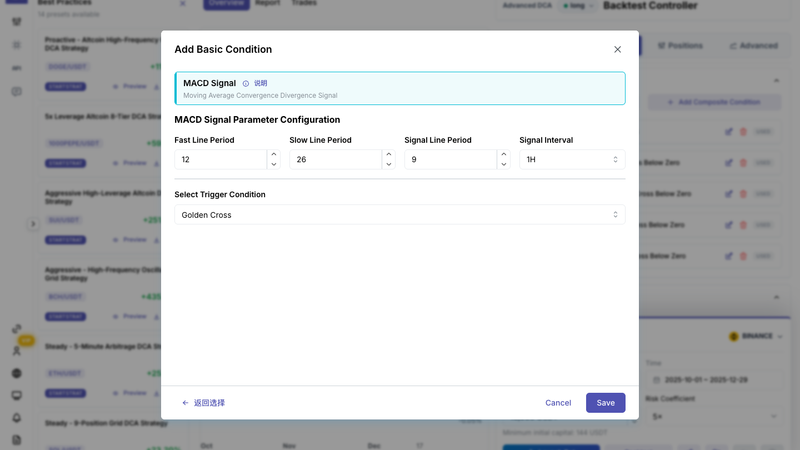
After selecting an indicator, fill in its parameters and timeframe, choose a "Trigger Condition" such as golden cross, death cross, or Golden Cross Below Zero, and save to return to the condition list.
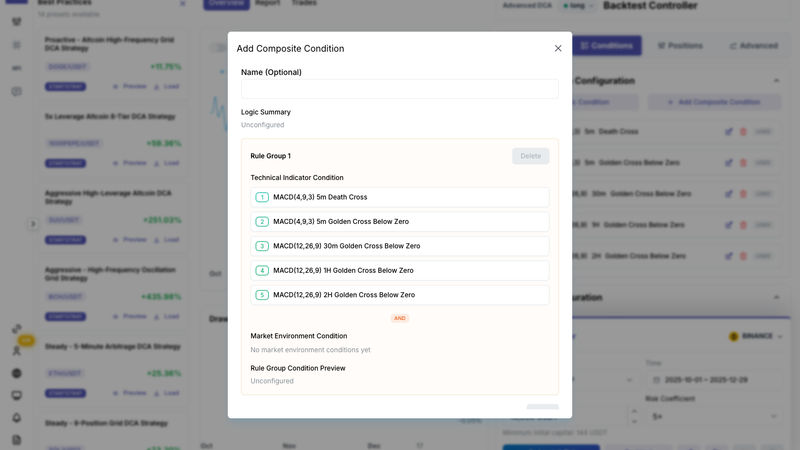
"Add Composite Condition" lets you combine several basic conditions into a more complex rule: within a rule group you tick some technical indicator conditions and market environment conditions and choose "and" or "or" for the group; multiple rule groups are always joined by "or". The "Logic Summary" and "Rule Group Condition Preview" on the right update in real time to show exactly what logic you've built, which makes checking easy. One trap to avoid: don't use "and" to join two instantaneous signals like two golden crosses in the same group, because they almost never occur on the same candle, so the group will effectively never fire.
6.4 Position Table: What Each Column Means
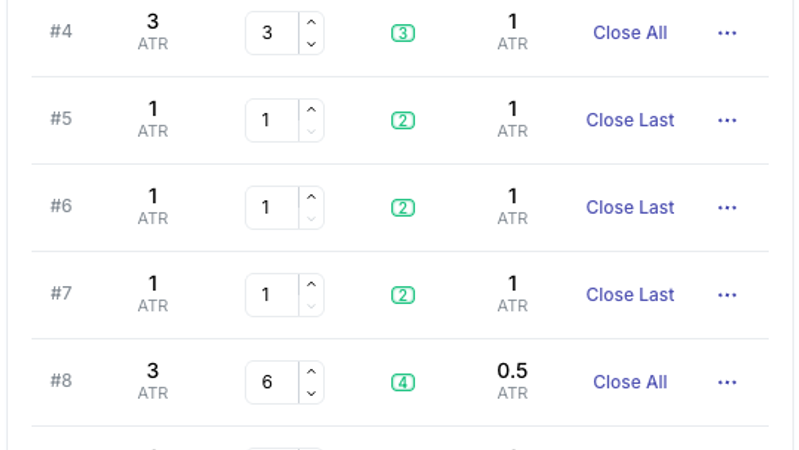
- Position: the position number. #1 is the first position, the one that opens first in each round.
- Spacing: how far price must move from the previous position's fill price before this one triggers, measured in ATR multiples, not percent. So when volatility changes, the actual price distance changes with it. The first position has nothing to compare against and shows "--".
- Order Multiplier: this position's size as a multiple of the "base unit". Base unit = capital × risk coefficient ÷ the sum of all multipliers, so changing any single position's multiplier recalculates the actual amount for every other position.
- Entry Conditions: which condition from section 6.3 this position references (enter the condition number). The position only opens when price has reached the level and this condition is also true; both are required.
- TP: this position's take-profit distance, also in ATR multiples.
- TP Type: "Partial" closes only this position; "All" closes every open position together. Click to toggle.
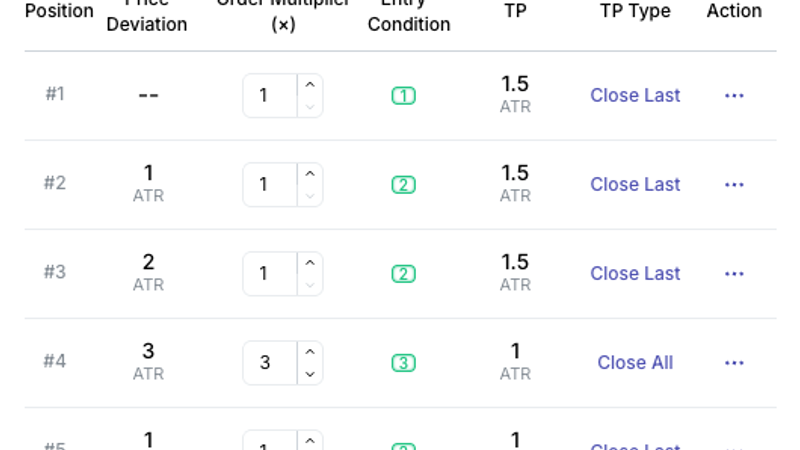
The "…" on the right of each row has Delete Position and Copy Position, and "Add Position" at the bottom of the table appends another. The default 12-position multipliers are 1,1,1,3,1,1,1,6,1,1,1,12: positions 4, 8, and 12 are noticeably larger "big positions" set to full take-profit. That's the official preset's rhythm, and you're free to change all of it.
6.5 Advanced: Compounding, System Take Profit, Trailing Take Profit, Stop-Loss Limit
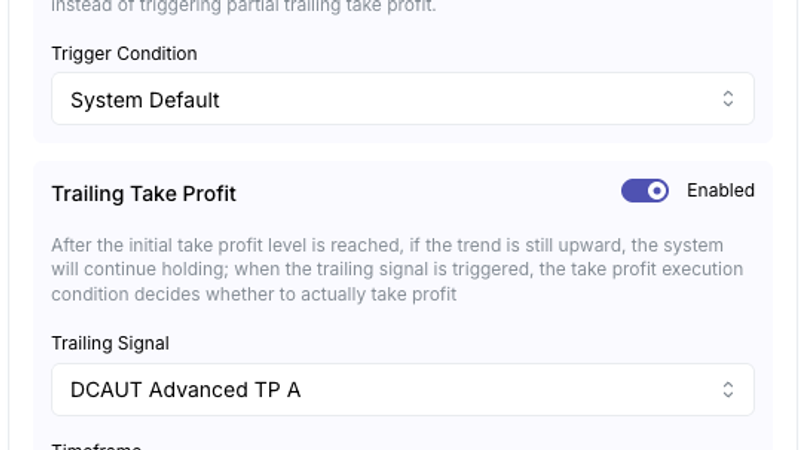
- The switches in Advanced are where beginners most often flip something on casually and most often plant a landmine; reading the description twice before changing anything is worth it. Compound Mode: rolls realized profit into the capital used for subsequent positions. Reinvestment Type is either "All Positions" or "Except First Position", with the reinvestment ratio set as a percentage. With "Except First Position", the first position is always sized from the original capital and only the added positions include profit, so the more you earn, the heavier the adds become relative to the first position; with "All Positions", the first position and the adds scale up together. Both choices have a big effect on the round's average cost and exit point, so don't toggle them casually.
- System Take Profit: when the combined profit of all positions meets the condition, it skips partial take-profit and closes everything at once. The only Trigger Condition currently available is "System Default".
- Trailing Take Profit: when enabled, reaching a position's preset take-profit level doesn't sell immediately; as long as the trend is still up, it keeps holding until the "Trailing Signal" fires, then the "Take Profit Execution Condition" decides whether to actually sell. The trailing signals are DCAUT Advanced Take Profit A / B / C, each with its own timeframe. The execution condition is one of three: take profit as soon as the signal fires; signal fires and price is not below the position's cost basis; signal fires and price is not below the original take-profit level. When disabled, the behavior is "take profit immediately when price reaches the position's preset ATR spacing".
- Stop-Loss Limit: when the open positions' unrealized loss reaches the set percentage of this instance's capital, everything is force-closed. Off by default.
6.6 Best Practices: Using the Official Presets
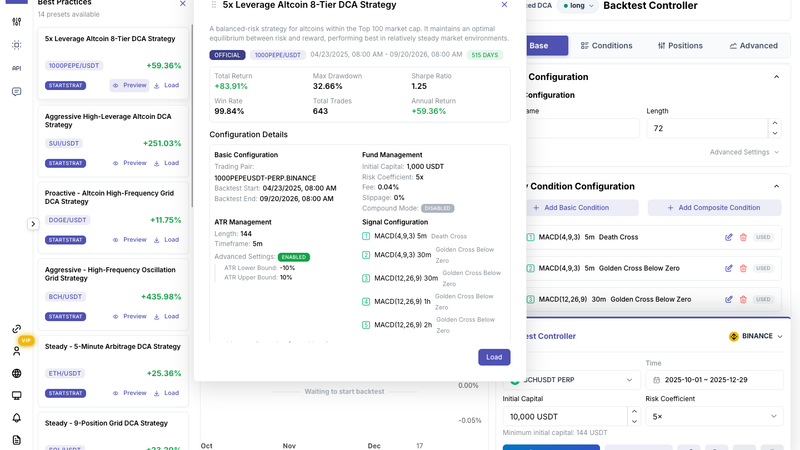
If you're agonizing over parameters, the official presets are basically the easiest way to "copy the homework". The "Best Practices" column on the left is the official preset library, 14 sets, each card labeled with its trading pair and backtest return. "Preview" opens the full parameters: backtest period and result metrics, base configuration, fund management, ATR, signal configuration, and position table. "Load" overwrites every parameter currently on the panel, so save your own changes first if you've made any.
The returns on preset cards come from official backtests. A win rate close to 100% is an artifact of how this kind of strategy is counted (a round only ends in profit) and shouldn't be used to judge quality; max drawdown and the backtest period are more informative.
6.7 Backtest Results: Reading the Three Tabs
- • Main chart: three lines, the trading pair's price (blue), realized return (green), and total P&L (dashed, including unrealized). "Split chart" draws them separately.
- • Drawdown: how far account equity has fallen from its peak over time; the top-right shows Max Drawdown.
- • Position Depth: which position level was reached at each moment; Max in the top-right is the deepest level reached during the backtest. This chart says more about how risky the strategy was in this period than the return does.
- • Margin Usage: capital in use over time; Max is the peak. Compare it to initial capital to see how much of your money was deployed at the deepest point.
- • Six metric cards: Realized Return, Max Drawdown, Sharpe Ratio, Win Rate, Total Trades, and Annual Return.
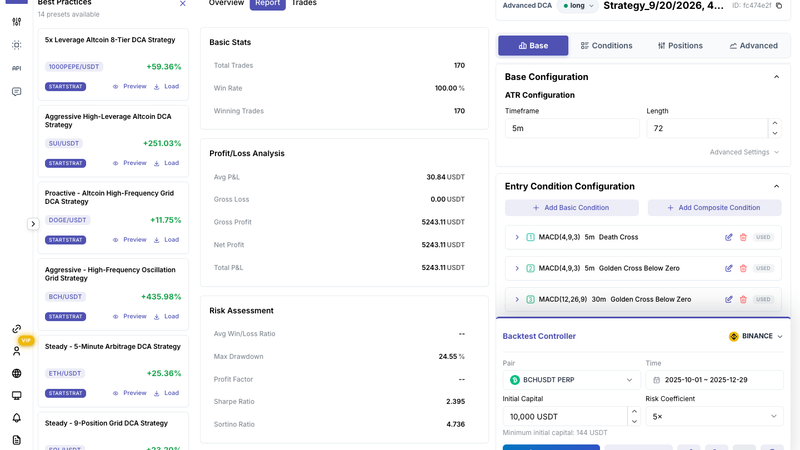
The Report tab is the full statistics: Basic Stats (trade count, win rate, winning trades), Profit & Loss Analysis (average P&L, gross profit, gross loss, net profit), Risk Assessment (average win/loss ratio, max drawdown, profit factor, Sharpe, Sortino), Extreme Values, and more. Each item comes with an explanation.
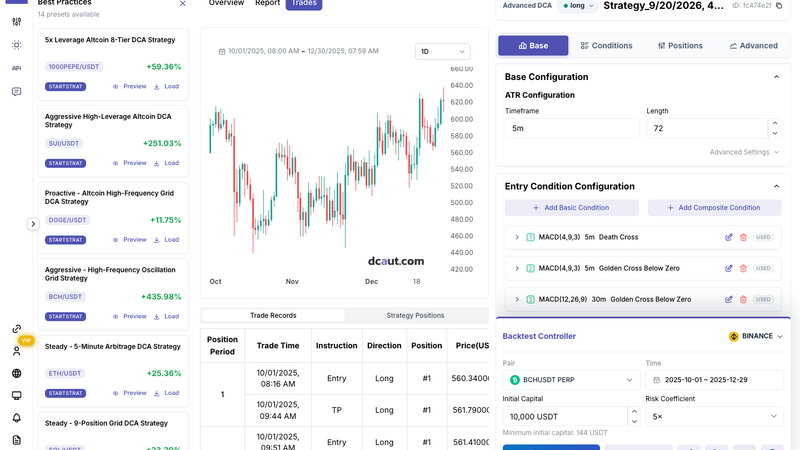
The Trades tab has a candlestick chart on top (timeframe switchable) and two tables below: Trade Records (position cycle, time, action: Entry / Add / TP / Close, direction, position number, price, quantity, fee, P&L) and Strategy Positions. To find out why a particular trade filled where it did, look here.
Backtests are driven by 1-minute candles, deciding and filling at candle close, with a default fee of 0.04% and funding rates included by default. The same parameters can produce very different results from a different start date; these strategies are highly path-dependent, so try several start dates and look at the worst one.
6.8 How the Parameters Interact: Think Before You Change
- Spacing and TP are both measured in the ATR set in Base Configuration. Change the ATR timeframe or length and every position's actual trigger distance changes with it, no need to edit row by row.
- Order Multiplier sets a ratio, not an amount. Base unit = initial capital × risk coefficient ÷ the sum of all multipliers. Add a position or change one multiplier and every other position's amount changes too.
- Margin used when every position is filled = initial capital × risk coefficient. So "how far price must fall from the first position to fill everything" depends on the number of positions, the spacing sequence, and the ATR together. Check it on the backtest's "Margin Usage" chart before going live.
- Entry conditions are bound to positions. If price reaches the level but the condition isn't met, the position doesn't open. It looks like a missed order, but it's the rule doing its job. To make a position open unconditionally, set its condition to no signal.
- Reinvestment type and the multiplier sequence need to be read together; they determine how big the first position is relative to the adds, which in turn determines whether one bounce can carry the whole round out.
- The same parameters can give very different backtest results from different start dates. When evaluating, try several start dates and look at the worst one.
That covers both parts: Part 1 is the five-step path from sign-up to your first running trading bot, and Part 2 is the parameter breakdown of the strategy workbench. Ultimately, DCAUT wants to break "automated trading" down into a few actions you can follow one at a time, choosing a strategy, setting parameters, verifying with a backtest, and then going live, rather than leaving you staring blankly at a wall of parameters. For your first setup, walking through Part 1 is the easiest route; before you start changing parameters in earnest, Part 2 is there as a reference whenever you need it.